


- Why are check valves essential in water utility and engineering applications
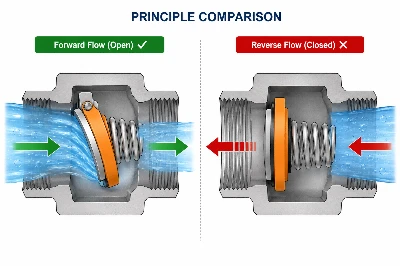
- How check valves work (simple principle + visual reference)
- Standard 5-step installation process
- Frequently asked questions
For water utilities and facility managers, a "creeping" water meter or backflow contamination isn't just a household annoyance-it can trigger customer complaints, billing disputes, and even regulatory compliance issues. The solution to these problems often lies in a component that costs only a few dollars: the check valve.
Though small in size, the check valve plays a critical role in ensuring metering accuracy and preventing pipeline contamination. This article provides a professional overview of its function, working principle, and proper installation procedures-in about 5 minutes.
1. Why Must a Check Valve Be Installed on a Water Meter?
Installing a check valve isn't optional-it's a necessary safeguard for water supply safety, consumer protection, and operational risk management. Its value is reflected in three core areas:
|
Function
|
How It Works
|
Value for Water Utilities/Engineering Teams
|
|
Prevents Backflow Contamination
|
When negative pressure occurs in the main line, the valve automatically closes, blocking downstream "dirty" water from flowing back into the upstream supply.
|
Eliminates drinking water contamination risks from siphonage; complies with national hygiene standards; reduces customer complaints and disputes.
|
|
Prevents Meter "Idle Rotation"
|
During pressure fluctuations, the valve stops reverse flow through the meter, preventing invalid readings caused by pressure differentials.
|
Avoids billing disputes and financial losses; improves customer satisfaction and utility credibility.
|
|
Protects Pipeline Equipment
|
Effectively reduces water hammer impact and prevents debris in reverse flow from damaging the meter's impeller.
|
Extends the service life of meters and downstream appliances; reduces maintenance and replacement costs.
|
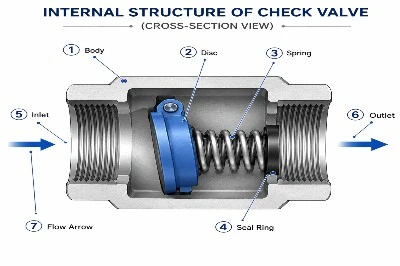
The check valve operates automatically in response to differential water pressure-no external power or manual intervention required. Its logic is simple:
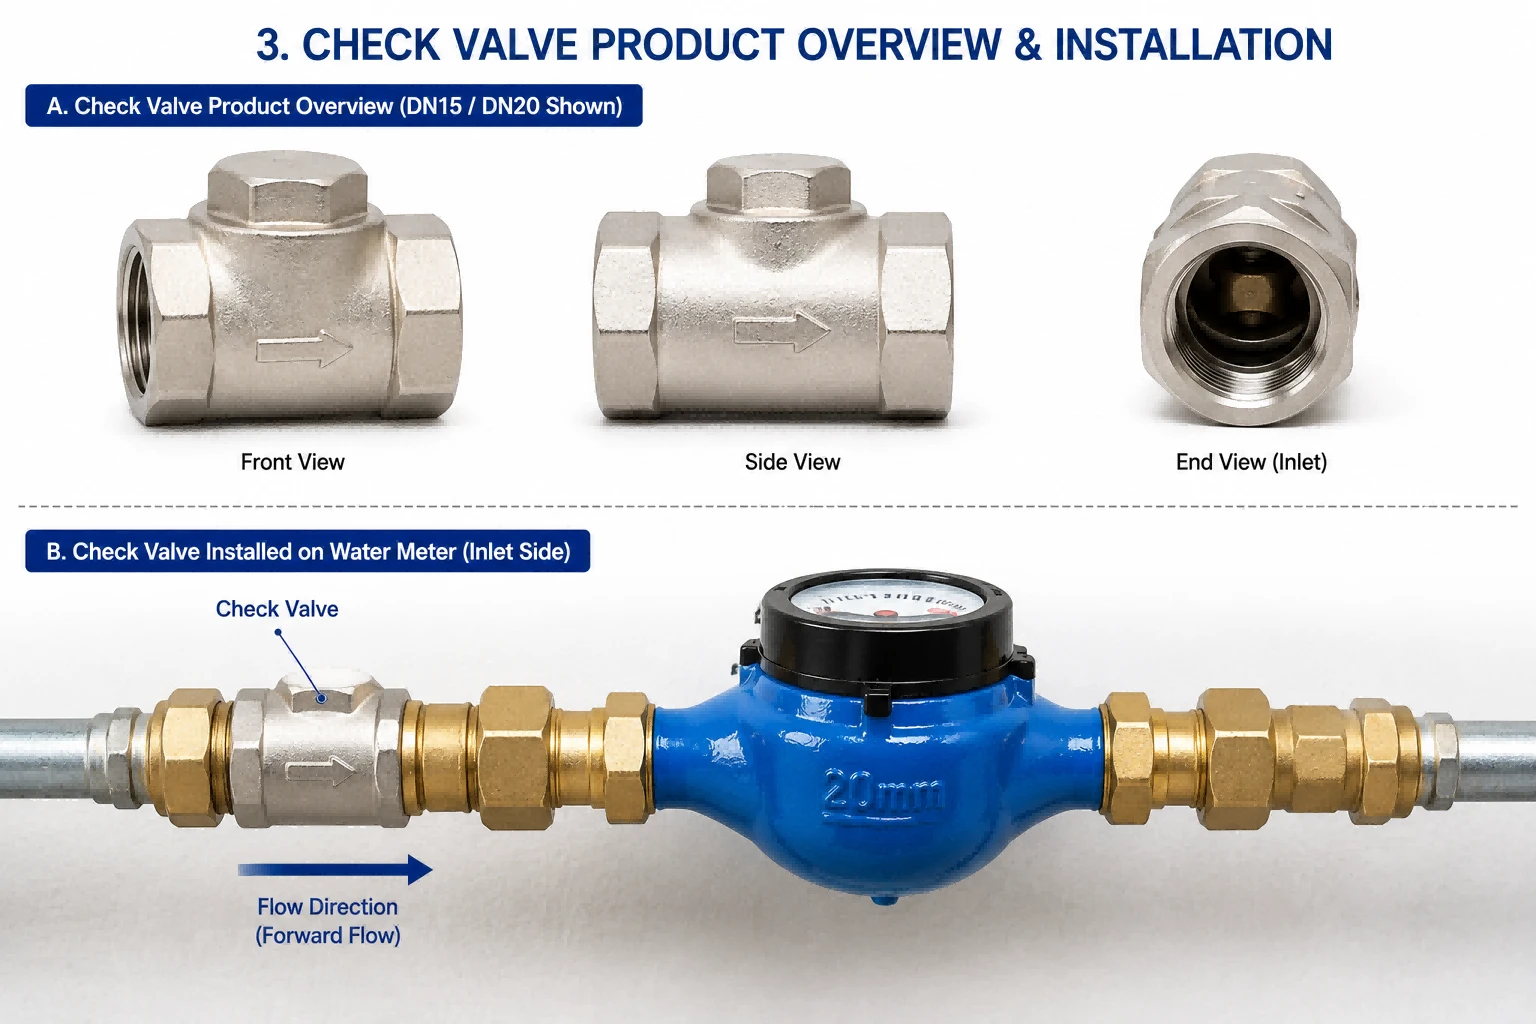
Product drawing
Working State Comparison
|
State |
Condition |
Disc Action |
Result |
|
✅ Open (Normal Use)
|
Inlet pressure > Outlet pressure
|
Water pushes the disc, compressing the spring, and opening the passage.
|
Water flows normally; the meter measures correctly.
|
|
❌ Closed (Prevents Backflow)
|
Outlet pressure > Inlet pressure (or water stops)
|
Spring quickly pushes the disc against the seal ring.
|
Passage is fully shut; backflow is blocked; meter does not reverse.
|
3. Standard 5-Step Installation Process
Before You Start:
- Tools needed: Two adjustable wrenches, Teflon tape or pipe sealant.
- Size check: Confirm the check valve diameter matches your water meter (e.g., DN15, DN20).
Step 1: Shut Off the Water Supply
Locate and close the main shut-off valve upstream of the meter.
Pro tip: Open a nearby faucet to verify the water is completely off before proceeding.
Step 2: Clean the Connection Port
Remove the old fitting from the meter outlet (or inlet). Wipe the threaded port with a clean cloth to remove rust and debris.
Important: Any debris left in the port can cause the check valve to seal improperly-don't skip this cleaning step!
Step 3: Install the Check Valve (Watch the Arrow!)
Screw the valve into the pipe or meter connection. The golden rule: The flow arrow (→) on the valve body must point in the direction of water flow.
Position guide:
- Before the meter: The arrow points toward the meter.
- After the meter, the arrow points toward the customer's pipe.
⚠️ Caution: Installing it backward will render the valve useless-either blocking flow entirely or staying stuck open, offering no backflow protection.
Step 4: Tighten with Two Wrenches to Prevent Leaks
Use one wrench to hold the valve body steady and a second wrench to tighten the union nut.
Note: Avoid using a single wrench with excessive force, which can damage the pipe. Tighten just enough to stop leaks; over-tightening can strip the threads.
Step 5: Restore Water and Check for Leaks
Slowly turn the main valve back on to gradually restore pressure.
Inspection: Wait one minute, then wipe all connection points with a dry tissue to check for any moisture.
Final test: With all faucets closed, the meter dial should remain completely still. After turning off a running faucet, the pointer should stop immediately with no slow creeping motion.
Q: How can I tell if my check valve is broken?
A: Close all faucets and watch the red triangular pointer on your water meter. If it continues to rotate slowly over several minutes-and you've confirmed there are no leaks in your system-the check valve is likely faulty, causing the meter to idle due to mainline pressure fluctuations.
Q: Does the check valve need regular replacement?
A: Yes. The spring will fatigue over time, and the seal ring will degrade. We recommend inspecting it every 2 to 3 years, or replacing it promptly if you notice the meter idling or hear water hammer noises in the pipes.
Q: Is it better to install it on the inlet side or the outlet side?
A: The two positions serve different purposes:
- Inlet side (before the meter): Primarily protects the main supply network from contamination.
- Outlet side (after the meter): Primarily protects the meter and downstream pipes.
Professional recommendation: Install one on both sides for two-way protection.